Safety v3.5.1 is now available. Upgrade using "pip install -U safety"
Safety Firewall
LogoLogo
Safety PlatformResearchSign Up
  • Introduction to Safety
  • Safety Firewall
    • Introduction to Safety Firewall
    • Installation and Configuration
      • Uninstalling Firewall
    • Using Firewall
      • Working with Codebases
      • Firewall Monitoring and Management
      • Firewall Policy Management
      • Troubleshooting
  • SAFETY CLI
    • Introduction to Safety CLI Vulnerability Scanning
      • Quick Start Guide
      • Migrating from Safety CLI 2.x to Safety CLI 3.x
    • Installation and Authentication
    • Scanning for Vulnerable and Malicious Packages
      • Viewing Scan Results
      • Available Commands and Inputs
      • Scanning in CI/CD
      • Securing Development Environments
      • License Scanning
      • Exit Codes
      • Scanning in Production
    • Safety Telemetry
  • Vulnerability Remediation
    • Applying Fixes
  • Integration
    • Securing Git Repositories
      • GitHub
        • GitHub Actions
      • GitLab
      • BitBucket
      • Azure DevOps
      • Git Post-Commit Hooks
    • Pipenv
    • Docker Containers
  • Administration
    • Safety Policy Files
    • Project Policies
  • Output
    • Output Options and Recommendations
    • JSON Output
    • SBOM Output
    • HTML Output
    • Detecting Vulnerabilities and Sharing Results via Email
  • Support
    • Support
    • Invalid API Key Error
    • Headless Authentication
    • Implementation Support
    • Global proxy and identity configuration
    • Using Safety in Conda Environments
  • Miscellaneous
    • Understanding Vulnerability Scoring Systems: CVSS and EPSS
    • Release Notes
      • Breaking Changes in Safety 3
    • Research and Blog
    • Changelogs
    • Trust Center
    • Terms of Service
    • Safety 2.x Documentation
Powered by GitBook
LogoLogo

Safety Platform

  • Sign Up
  • Login

Research

  • Security Research & Blog

Resources

  • GitHub Action
  • GitHub

© Safety CLI Cybersecurity Inc.

On this page
  • Step 1: Get your Safety API Key
  • Step 2: Set up a Gitlab Pipeline on your repository (If you don't have one already)
  • Step 3: Configure your .gitlab-ci.yml YAML file to run Safety
  • Final Step: Add your Safety API Key as a Gitlab repository variable
  • You're done!
  • Next Steps: Configure your Pipeline file, and learn more about Safety

Was this helpful?

  1. Integration
  2. Securing Git Repositories

GitLab

PreviousGitHub ActionsNextBitBucket

Last updated 1 year ago

Was this helpful?

This is a guide to setting up and configuring Safety to scan your Gitlab repositories for dependency security vulnerabilities. This enables you to configure security and compliance scans on your repositories on new commits, new branches, pull requests, and more.

You can set up Safety to run security scans on your Python repositories in GitLab using Gitlab Pipelines.

Step 1: Get your Safety API Key

To scan any systems for security vulnerabilities, you first need a Safety API key. .

Step 2: Set up a Gitlab Pipeline on your repository (If you don't have one already)

Gitlab pipelines are an easy and powerful way to run CI/CD processes on your codebases managed on Gitlab. Adding Safety security scans to your repositories is as easy as adding a few lines of code to your Gitlab pipeline configuration file to install Safety (our command-line tool) and then run a Safety scan.

We've created some full pipeline examples below if you don't have one set up yet. If you need help configuring your pipeline, you can read more on .

Step 3: Configure your .gitlab-ci.yml YAML file to run Safety

Gitlab pipelines are configured using a .gitlab-ci.yml YAML file at the root of your Gitlab repository. Here is an example YAML file that installs and runs Safety to scan your Python environment for security vulnerabilities.

YAML

#  PyUp Security Scans Template

#  This template allows you to run security scans on your Python dependencies.
#  The workflow allows running tests on the default branch.

image: python:latest

# Change pip's cache directory to be inside the project directory since we can
# only cache local items.
variables:
  PIP_CACHE_DIR: "$CI_PROJECT_DIR/.cache/pip"

cache:
  paths:
    - .cache/pip
    - venv/

before_script:
  - python --version  # For debugging
  - pip install virtualenv
  - virtualenv venv
  - source venv/bin/activate
  - pip install safety

run:
  script:
    # Install your requirements. Alternatively install via Poetry or Pipenv
    - pip install -r requirements.txt
    # Run Safety's environment scan
    - safety --key $SAFETY_API_KEY --stage cicd scan

Your pipeline YAML file will likely end up running other tests and actions and deployments. All you have to do to ensure that Safety is scanning your dependencies for security vulnerabilities is to ensure that the following code (script) is in your YAML file amongst your other tests and scripts that are running.

YAML

...
  script:
    # Install Safety - PyUp's command-line tool
    - pip install safety
    # Install your Python dependencies as per usual. 
    # This example uses requirements.txt and pip, but you may use Poetry with its Pipfiles, or pipenv with its pyproject.toml file. 
    - pip install -r requirements.txt
    # Run safety to scan the local Python environment. This will scan all installed dependencies, including any transitive dependncies that get installed during your installation
    - safety --key $SAFETY_API_KEY --stage cicd scan

Final Step: Add your Safety API Key as a Gitlab repository variable

Your safety script requires the Safety API key to connect to Safety and get the latest commercial vulnerability database. To link up this API key to the $SAFETY_API_KEY variable defined in your pipeline YAML file (example above), you need to add your Safety API key as a Gitlab CI/CD environment variable. To do this, navigate to your repository on Gitlab, go to your project’s Settings > CI/CD and expand the Variables section.

Once added, the new variable should display like the screenshot below on the Gitlab repository variable page:

You're done!

That's it! You now have a fully working Gitlab CI/CD pipeline that will run and scan your Python dependencies for security vulnerabilities on new pushes and pull requests using Safety's commercial vulnerability database.

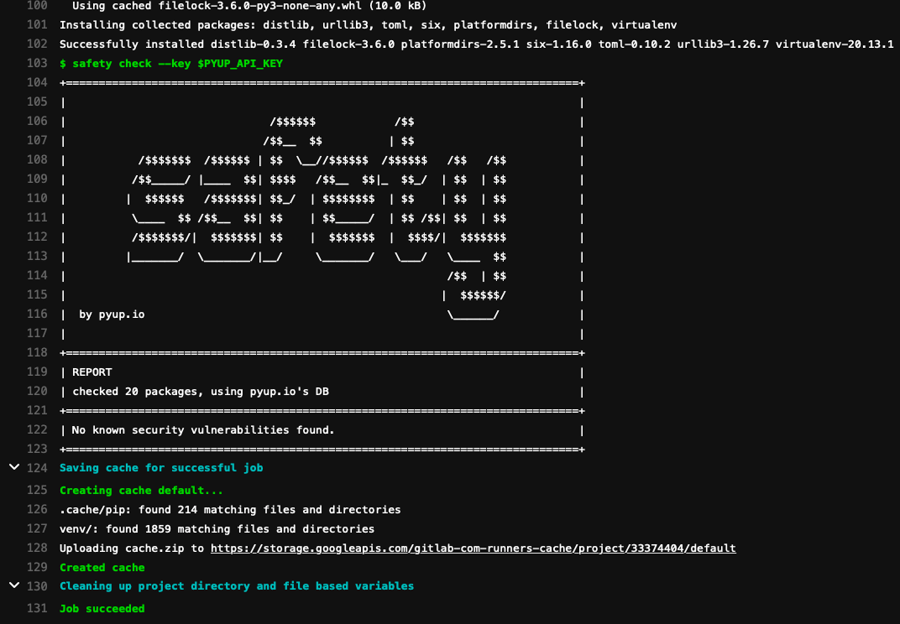
If there is a vulnerability found, Safety will return a non-zero exit code and fail the test. You can then see the pipeline's output in Gitlab to see what Safety found and how to patch the vulnerabilities. Here is our example running on a new pull request:

Next Steps: Configure your Pipeline file, and learn more about Safety

Gitlab Pipelines There are many more configuration options on Gitlab CI/CD Pipelines. For example, you can set up this Pipeline to only run on certain branches or run when other conditions are met. You can also configure it to run periodically using a cron so that your repository is scanned for security vulnerabilities every hour or every day, not just when new code is committed.

Safety Command-Line Interface (CLI) These scans use Safety's Command-Line tool, which has many options and configurations to meet your needs. Instead of scanning your local environment after you've installed your dependencies, you can also configure it to scan specific requirements files, output different formats, or even scan for license compliance issues.

You can read more about Gitlab pipelines on their .

You can read more about Safety and how to use it on its .

You can create a Safety account and get your API key here
getting startup with Gitlab pipelines
documentation page
Github page
1072
973